

Or, how to build websites that update themselves “automagically.”
So you love building stuff for the web. Awesome. Welcome, you’re in good company.
You’ve probably found that after awhile, content updates for sites can get painful and repetitive. Even with a great CMS, there’s some content that changes frequently that can get time-consuming to update manually.
I’m going to walk you through how to use Wordsmith and Google Sheets to update content on your website by simply changing a value in a spreadsheet. If you want to follow along in code, check out the git repo that I’ll be using as my example.
But first, why?
A simple example, one that I’ll use for this tutorial, is that of a weather report. Let’s say you run a website that has weather conditions for skiing at Mt. Bachelor. The conditions change all the time, but they’re really just based on a bunch of data points (i.e., “base temperature”, “wind chill”, etc).
Let’s say that you have a simple webpage with information about the current conditions.

It looks pretty simple, but when you think about updating this every day, and writing new content each time, it gets tedious pretty quickly.
What I’m going to show you is how to to update the content you see above using the Wordsmith API and a simple Google Apps Script, so that you can achieve something like this:

If you already have a website that you want to use this with, feel free to use that. If not, I’ll show you how to setup a simple Express app, and how to host it using Heroku.
Getting started
Before we start, you’ll want to have a few things setup:
- You should have a Wordsmith account.
- You should have a Google Drive account that you can use to create a new Google Sheets file.
This is a three step process:
- Building the Wordsmith project
- Setting up Google Sheets
- Setting up your website
Step 1: Building the Wordsmith project
We’re going to setup a Wordsmith project that we can use with Google Sheets. First, you’ll want to login to your Wordsmith account, and create a new project. Choose the option to Upload a CSV file, and upload the CSV file here to your new project.
Once you’ve uploaded your CSV, you should find yourself in the Wordsmith template editor, with a blank new template that looks something like this:
For the purposes of this tutorial, we’ll write a very simple sentence just to get everything working. You can come back here later and create a more complex template. For now, add a simple sentence, using a single data variable.

For reference, the template that’s used to generate the content shown at the beginning of this article looks like this:
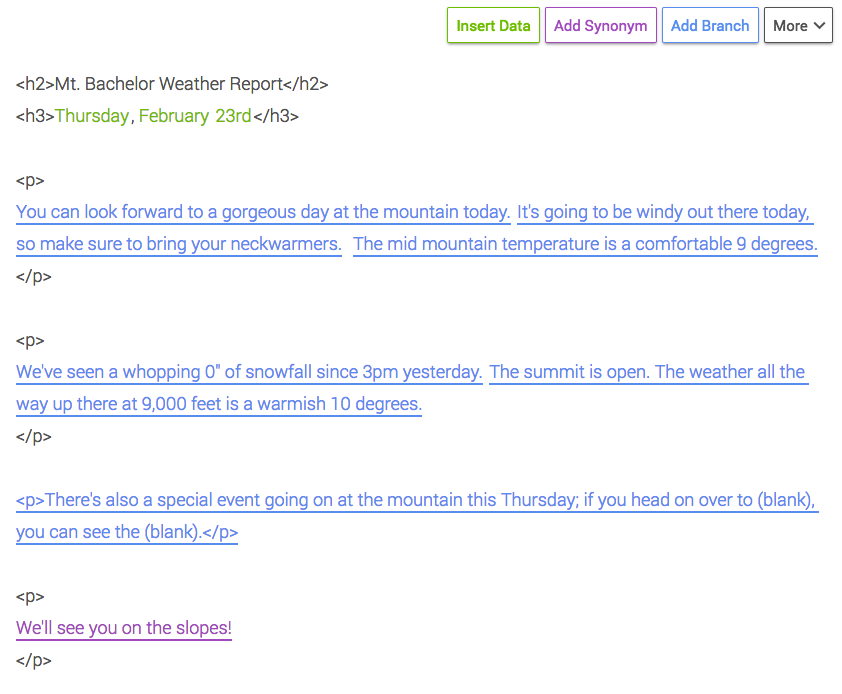
Yep, there’s HTML in there. You can do this in Wordsmith, which you’ll see is pretty useful for our site. Once you have your Wordsmith template setup, we’ll move onto the next step. Remember: keep it simple: you can always come back here later and build a more complex template.
Step 2: Setting up Google Sheets
We’re going to create a new Sheets document and connect it to our website. The website doesn’t exist yet; we’ll get to that next.
Head on over to Google Sheets and create a new blank document. Now, we’re going to import our sample CSV into the document. Navigate to File > Import… and upload the same CSV that you imported into Wordsmith.
When you’re done, you should have a document that looks like this:
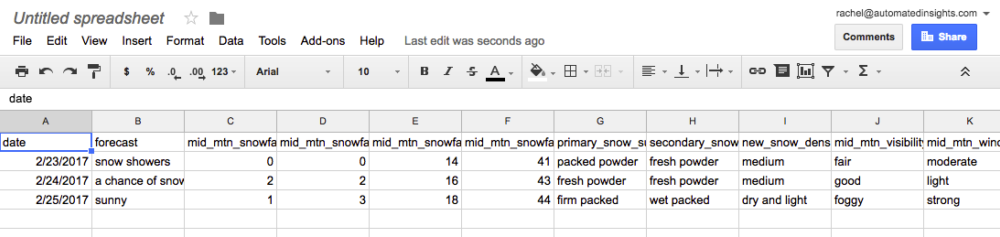
Scroll all the way to the right until you see that last column titled “SEND”. This is our magic column, the one that we’re going to setup as our trigger to send data to our website. It’s not part of our actual dataset, but it’s what we’ll setup the Google Apps Script to listen for when sending data to your website.
Let’s dive into the Apps Script. This is basically JavaScript with some Google helpers on top, so if you know JavaScript, this should look familiar. To add a script to your document select Tools > Script editor… Replace the contents of Code.gs with the contents of this file. Save your changes.
Now, let’s walk through what the Apps Script is doing. First, see the top section:

The WEBSITE_AUTHORIZATION_HEADER is optional, feel free to ignore it for now, we’ll cover it when we setup the website. The WEBSITE_POST_URL should be changed to match your website. If you haven’t set it up yet, also feel free to ignore this for now. TRIGGER_COL_INDEX is the column index that will trigger a post request to your website. This is done so that you can make lots of changes to a row in your spreadsheet and only send the data when it’s all ready. If you add or remove columns from your dataset, you’ll want to change this value.
Tip: hitting (Cmd + Enter on a Mac, or Ctrl + Enter on a PC) will open the Logs in the Apps Script editor. This can be helpful when debugging your script.
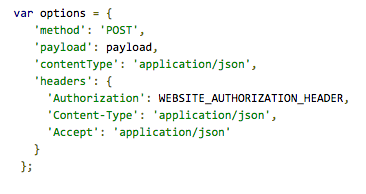
The Apps Script is setup to grab all the values from a single row, and send them as JSON to your website via a POST request. If you take a look at the options object, you can see exactly what’s getting sent over to your website:
Now, we’re going to add a trigger to run this script when an edit is made to your Sheet. Open up Resources > Current project’s triggers… and add a new trigger. Select ‘onEdit’ for the ‘Run’ option, ‘From spreadsheet’ for the ‘Events’ option, and ‘On Edit’ for the trigger type. Your selections should look something like this:
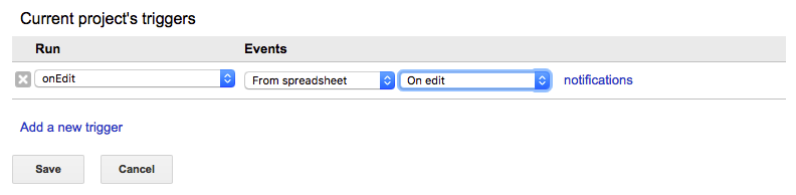
Save your new trigger.
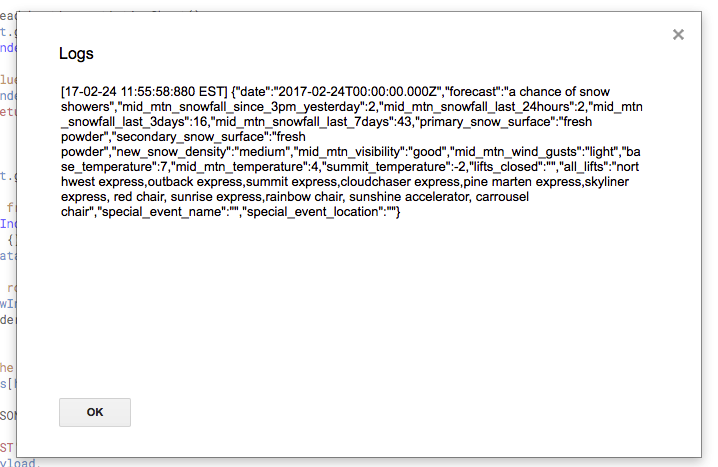
To test this out and make sure it’s working, try making a change to the SEND column in your CSV. Now, open the logs (CMD + enter) in the Apps Script editor. You should see that we hit the line logging the payload:
You’re now ready for the final step: setting up your website to handle receiving the POST data from Google Sheets.
Step 3: Setting up your website
This step assumes that you do NOT already have a site that you want to use. If you do have a site that you want to use, then feel free to skip this part. You will however need to do the following:
- Adjust the WEBSITE_POST_URL in the Google Apps Script to match your existing endpoint.
- Pass the data from sheets along to the Wordsmith API. You can learn more about the Wordsmith API from the docs, and take a look at our example below if you want to see how to do this.
- Once you get a response back from the Wordsmith API, it’s up to you what you do with it. The example below shows how to use websockets to update the UI, but really at this point you could do anything you want.
Assuming that you are going to setup a new website, the good news is that most of the code is already there for you in this git repository.
First, clone the repository. Follow the setup instructions in the README to get the application running locally.
Once the app is running, you browse to http://localhost:3000/ and you should see a screen that looks like this:
The website: server side
This example app consists of a single API endpoint, and a simple view. Let’s walk through how it works.
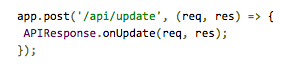
Open up server/index.js. Towards the bottom of the file, you’ll see a block like this:
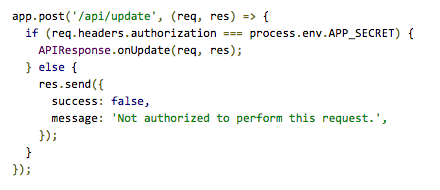
That’s our API endpoint for the Google Apps Script. The authorization header exists to secure your endpoint against unwanted requests. If you want to use this, make sure that you’ve replaced the WEBSITE_AUTHORIZATION_HEADER in the Google Apps Script with your APP_SECRET.
If you want to live dangerously and skip that part, you could also just do this:
Now, let’s dive into what happens when we get a valid request. Open up server/response/api.js.
Take a look at the onUpdate() method:
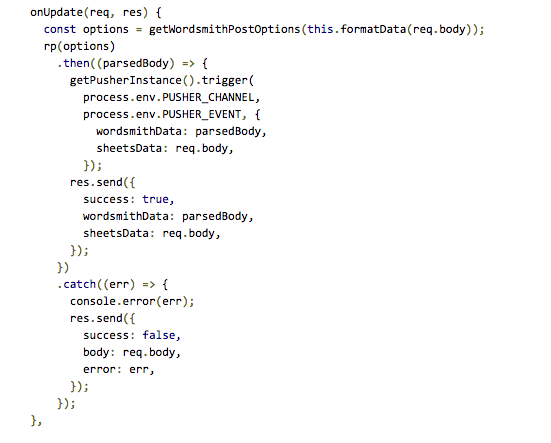
Let’s break down what’s happening here.
- We first build up an options object that includes everything that the Wordsmith API needs to generate a story from your project.
- Using the request-promise library (that’s the `rp` bit), we send our data from Sheets to Wordsmith.
- We get back the parsedBody response from Wordsmith, and from there, we can do whatever we want with it!
- In this example, we’re sending the data to a Pusher channel, which is what’s used to update the UI without a page refresh (Pusher a simple websockets API if you’ve never used it before).
The cool thing about websockets is that you can listen to and interact with the same channel on both the client and the server. This is incredibly useful for server => client communication, where we want to update the UI without a page refresh, or polling.
The website: client side
Let’s take a look at the front-end piece of this site. Open up app/src/main.js.
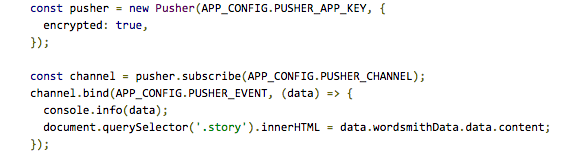
We’re binding to our Pusher channel, and then listening for a specific event. When that event fires, we take the data and replace the contents of the “.story” div element with our new html string. That’s it!
Now, there’s one big piece here that’s missing, and that’s that we need this app to exist in a public location so that the Google Apps Script can send data to it.
If you’re already comfortable deploying your own site, feel free to skip this last step. Otherwise, follow the instructions for first time deployment setup in the README.
Deploy and iterate
Once you are able to deploy your site to production, you’re ready to try it out! Go ahead and try making a change to a value in your spreadsheet that you’re using in the Wordsmith template. You should see your content updating on your site.
One cool thing about websockets is that once you have the endpoint in production, you can see the content updating in your local application: the channel you bind to locally is the same channel that production is sending data to. This is very useful if you want to keep building this out locally without deploying each time.
This just one example of what’s possible using the Google Sheets, Pusher, and the Wordsmith API. Feel free to use this project as a base for your own; now go build something awesome!